GreenBoard
Getting started with GreenBoard
GreenBoard is the beginning of a tractor simulator program that lets us simulate a CAN network. When connected to a tractor ECU, this test bench could allow us to someday analyze the protocol more systematically and incorporate other methods of analysis and penetration testing that are so invasive that they cannot be performed on a working tractor:
Contents
- Getting started with GreenBoard
- How to install the GreenBoard software
- How to operate the GreenBoard
- Additional Information
How to install the GreenBoard software
The J1939 ECU simulator board or we call it the ‘GreenBoard’ can be found here. This board interacts with a windows application. The windows application can be found here: Github for windows APPPPPPPPPPPP
In order to connect with the board you first need to download the driver for it. Once the driver is installed you should be able to run the windows application located at following location:
polyCan_jCOM/polyCan_jCOM/bin/Release/polyCan_jCOM.exe
Everything is installed now to operate the GreenBoard.
How to operate the GreenBoard
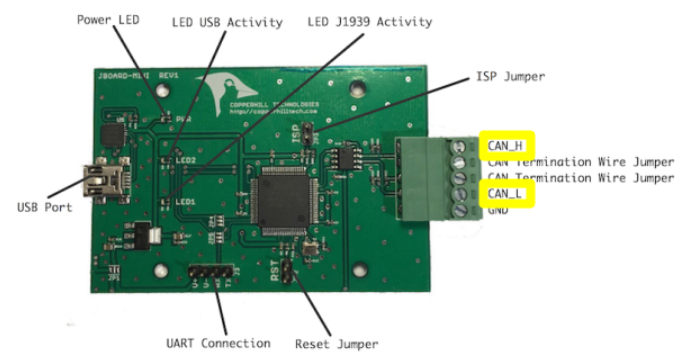
To connect the board to a CAN network you will need to connect the CAN high and CAN low data lines to the board. The proper way to connect these lines to the board is shown in the following image. After connecting the board to a CAN network, you can get started with sending or receiving commands.
Once the application is running you need to select the correct COM port that the board is connected to. If the application successfully connected to the board then you will see text appearing in big text box of adding a filter to the board. This means that the board is ready and already listening for any CAN traffic. By default the application saves all commands found in a csv log file in the directory: polyCan_jCOM/polyCan_jCOM/bin/Release/logs/ with a unique name depended on the timestamp of when you started recording.
In order to send command from this board, you first need to claim an address. To do this enter a number in the “Addr” field next to the “Claim Address” button. You must give a valid address number to claim (between 0 and 254) and there can’t be CAN device already using that address. In the big logging text box you will see a message as to weather the address claim was successful. If it was successful then you can being to send logs, otherwise try a different address, verify you are connected to a valid CAN bus, or restart the board.
Even though you claimed an address you will still be able to transmit logs with any source address, this address claim is just a software lock the board has to prevent it from sending commands on a non valid CAN network, but does not actually get used for transmitting log files.
To send a command you first need to load a log file you want to send. The button “Load Log” will open a file selector window. Once you choose an appropriate log file, to being transmitting click the “Transmit Log” button. This will send out the commands as fast as the board allows.
If for any reason during operation of the board you see the 3 status green lights stay on without any flashing and are having troubles communicating with it, this means that the board got locked up. A problem that we have not been able to prevent. The solution to this is the unplug the board, wait about 5 seconds then plug the board back in. This should reset the board back to an operational state.
Additional Information
For more detailed information about GreenBoard please see the GreenBoard Developer Guide