PolyCAN
Getting started with PolyCAN
PolyCAN is a diagnostic tool that enables communication on the John Deere CAN bus. It allows anyone with a linux machine to record all messages on the CAN bus and analyze the payload of these messages. With PolyCAN, one can also send messages on the bus to communicate with the tractor computer systems. PolyCAN features a clear command line interface and features a variety of diagnostic tools:
Contents
- Getting started with PolyCAN
- Installing PolyCAN
- Setting Up the CANable Board
- Connecting to a Tractor
- Connecting to the CANable Board
- How to operate the CANable board with PolyCAN
- Working With Logs
- Additional Information
Installing PolyCAN
PolyCAN runs on linux. If you do not have a linux machine, you can use a virtual machine. Once you have booted in a linux environment, you should have python 3 installed. If you do not have python 3, download and install the latest version. Once you have a linux environment with python 3, open terminal and run the following command:
$ pip install git+https://github.com/TractorHacking/polycan
You should see the installation take place. Once it is finished, run the program with:
$ polycan
Setting Up the CANable Board
The CANable board is required to capture logs with PolyCAN. Before you connect to the board, verify that you have installed net-tools and socketcan. The easiest way to install socketcan is to install can-utils, which includes a nice toolset for interacting with the CAN bus. We have implemented many of the features available in can-utils like the ability to listen and playback logs.
The firmware that comes installed onto the CANable board by default is not what we use. It comes with slcan firmware, however this is slower as this creates a virtual CAN device instead of a native CAN device. In order to put the different firmware onto the board follow CANable’s documentation on flashing candlelight firmware found here, under section “Alternative Firmware”: CANable
Everything is installed now to operate the CANable board.
Connecting to a Tractor
To connect to a tractor you will need a computer running the PolyCan program, the CANable board, and some way to connect to the j1939 OBD II connector on the tractor. We used a j1939 OBD II cable that we then spliced two of the data lines that we actually concerned with. If possible we recommend this solution as tring to just jamn some wires into the tractors female j1939 OBD II connector is more risky (chance of connecting to the wrong port), and does not create as good of a connection.
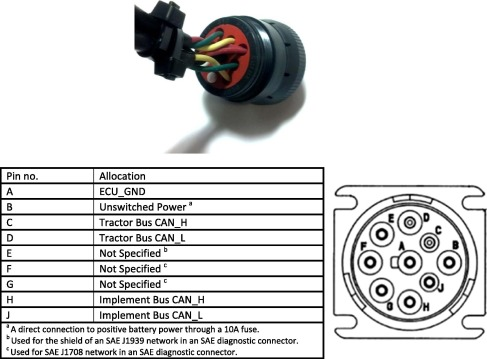
There is only two pins that we need to actually connect to, the CAN high and CAN low data line. In the following figure these two lines correspond to Pin C and Pin D.
Once you have a wire connected to the CAN high and CAN low pin you need to connect that to the CANable board. Thankfully the CANable board has labels next to the screw terminals as to which pin is CAN high and CAN low. You do not need to attach anything to the ground terminal on the CANable board, you can leave this disconnected. With all the wires connected you should be all set up and ready to send and receive commands!
Connecting to the CANable Board
Once you have all the needed libraries installed and running the candlelight firmware, connect the CANable board to your computer and run the bash script “bringUp” it is found in the following location: polycan/CANable/bringup. You will need to run this command from a terminal and give the script superuser privileges. This can be done by typing the following command (this is assuming you are in the CANable directory):
sudo ./bringUp
If everything is working correctly you should see the red and green lights on the CANable board go from on to off and remain off. If you don’t see the lights change on the board or see a warning printed in the terminal, you will need to try and unplug the board and try the command again (the script should display a line reporting if it correctly created and can device, if there is a warning it will be clear). Once you see the lights correctly turn off, and no warning displayed in the terminal you should be good to go!
How to operate the CANable board with PolyCAN
The CANable board is integrated into our polycan application. In order to start logging files navigate to the polycan menu option to “Capture Log”. Once you selected this option it will prompt you to enter a name for the log file. Once you enter a name it will start logging and display how many command it has heard so far. Once you are done listening to commands, to exit all you need to do is hit enter and you will be back at the PolyCAN menu with all the commands logged saved to the log file you specified.
For sending a log file the process is nearly identical. First select the menu option to “Send While Capturing Data”, this operation will let you send a log file while listening on the CAN bus to see how the other CAN devices respond to the new commands.
Note: in the log file generated by this all commands sent out will have a negative timestamp signaling that the board did not actually receive the command but sent it, this way one can see when the commands were actually sent out.
Once you have selected the correct menu option it will prompt you to enter a log name to store all the commands found while listening. After entering a name and hitting enter it will prompt you for the name of the log file you want to transmit. After you enter a valid log file name the program will start logging all CAN traffic. To send the selected log file you will need to hit enter once. After you hit enter you should see the console show you how many commands have been received and sent. When you are done and want to exit just hit enter again and you will be back at the PolyCan menu.
Working With Logs
Manipulate logs
To edit a log and send it back to the tractor to affect for example the visual output of the tractor dashboard, like the gauge which shows the engine rounds per minute (RPM) select the menu option to “Manipulate log”. Choose one of the logs which are stored on the used device or in the Database. This function will replace the data for the chosen PGN and will not affect the other parameters. For changing the engine rpm which is shown on the RPM gauge on the dashboard, follow the give examples in the function. The log can be splitted into as many sections as required, to edit only pieces of the log with new commands..
Comparison between logs
For analyzing captured logs, there are various options to do that. One of them is the comparison between logs. This could be helpful if logs from a working tractor and a broken tractor are available. The menu option “Compare logs” is looking for data commands which are only present in one log. The log you choose first should be the log in which you expect for example an error code. In this case the recorded log from the broken tractor should be the log which is choose first. It compares every entry from the first log with every entry from the second log. If the entry is only present in the first log, it checks for the smallest difference of the chars in the data section of the entry and prints that out. As shown in the figure below, only the bits with index 8 - 9 are not present or different in the second log. For that PGN in bits 6 - 9 the engine RPM is stored. By this information we can tell that the tractor was only in the first log running at that specific RPM.
Showing one entry of a log compared to another. (From left to right: index, PGN, Data, amount of different bits, different bits index, PGN name, different bits)
Additional Information
For more detailed information about PolyCAN please see the PolyCAN Developer Guide